


You’ve just received a contract back from the counterparty. One attachment is labeled “redline.” Another is labeled “blackline.” They look similar — both show changes — but they serve completely different purposes in the negotiation. Sending the wrong one to the wrong person at the wrong stage can derail a deal.
Redline vs Blackline: What’s the Actual Difference?
A redline and a blackline are not the same document, and using them interchangeably is one of the most common (and costly) terminology errors in contract practice.
Redline: A working draft with tracked changes visible. Insertions, deletions, and comments from one or more reviewers are displayed inline. Used during active negotiation.
Blackline: A clean comparison of two saved document versions. It shows only what changed between a baseline and the current version, without the commentary, color coding, or in-progress markup of a redline. Used for verification, not negotiation.
The simplest way to remember it: a redline is a conversation. A blackline is an audit.
| Redline | Blackline | |
|---|---|---|
| What it shows | Proposed edits with tracked changes and comments visible | Differences between two saved document versions |
| How it’s created | Track Changes turned on while editing in Word | Word’s “Legal Blackline” option under Compare Documents |
| Primary purpose | Active negotiation and collaborative review | Pre-signature verification and executive review |
| Who uses it | The editing party and their counterpart, during back-and-forth | Both parties (or legal alone) to confirm a clean final version |
| Includes comments | Yes | No |
| Risk | Changes made without Track Changes are invisible | Cannot be used to add new edits, for review only |
| Historical origin | Red pen on paper | Red-marked document photocopied (turning marks black) |
When Should You Use a Redline?
Use a redline during active contract negotiation. Any time you’re marking up a counterparty’s draft, incorporating feedback from internal stakeholders, or returning a document for another round of review, the redline format keeps the full record of proposed changes visible and attributable.
Typical scenarios where a redline is the right format:
- First markup of a counterparty’s template: you want them to see exactly what you’ve changed and why
- Round 2 or 3 of negotiation: the redline preserves the history of concessions and positions across rounds
- Internal pre-clearance review: your compliance or finance team needs to see proposed language before it goes back to the counterparty
- M&A due diligence: outside counsel mark-ups on transaction documents where every edit must be attributable
One practical rule that saves hours: always agree with the counterparty on who “holds the pen” at each stage. Only one party should be editing the working document at a time. Simultaneous redlines from both sides create merging problems that are tedious to resolve and easy to get wrong.
When Should You Use a Blackline?
Use a blackline immediately before signature, and any time a senior stakeholder needs to review what actually changed without wading through comment threads.
A blackline answers a specific question: is this execution copy identical to the last agreed version? It is your verification layer, not your negotiation tool.
Typical scenarios where a blackline is the right format:
- Pre-execution sign-off: confirm the final execution copy matches the last negotiated version exactly
- Board or executive review: a General Counsel presenting a finalized contract to the CFO or CEO wants the clean comparison view, not the full redline history
- Post-negotiation internal audit: document what changed from your standard template across a completed deal
- Dispute resolution: if a signed contract is challenged, a blackline against the previous version provides a clear evidentiary record
How to Generate a Blackline in Microsoft Word
To generate a blackline in Word, go to Review > Compare > Compare (on Mac: Tools > Track Changes > Compare Documents). Select your original document as the “Original” and your updated file as the “Revised.” Under settings, check “Legal blackline”, this tells Word to show only the content differences, suppressing existing tracked changes and comments from the redline stage.
The result is a clean, consolidated comparison document. This is what you send for executive sign-off. This is what you archive as the negotiation record.
Redline, Blackline, and Blueline: The Complete Picture
Most legal teams work with two document types. But there is a third, the blueline, that is underused and rarely explained.
| Redline | Blackline | Blueline | |
|---|---|---|---|
| Purpose | Active negotiation | Version verification | Internal review only |
| Visibility | Shared with counterparty | Shared with counterparty or executives | Never sent externally |
| What it shows | Proposed edits from the reviewer | Differences between two versions | Internal annotations and risk flags |
| When to use | During negotiation | Pre-signature, post-negotiation audit | Before sending a redline externally |
| Typical tool | Track Changes (Word) | Compare Documents (Word) | Comment mode or annotation tools |
A blueline is essentially your internal working layer: the notes, flags, and reviewer comments you circulate within your team before producing a clean redline for the counterparty. It is not standard terminology everywhere, but the workflow concept is universal. Review internally before you reveal externally.
How to Redline a Document in Microsoft Word
Microsoft Word is the default drafting tool for legal professionals, and Track Changes is its native redlining feature. Here is exactly how to use it.
Step 1: Turn On Track Changes Before You Edit
Open your document and activate Track Changes: Review > Track Changes > Track Changes (keyboard shortcut: Ctrl + Shift + E on Windows / Cmd + Shift + E on Mac).
A small indicator appears in the status bar at the bottom of the screen confirming Track Changes is active. Do not start editing until you see it. Every edit made before it is turned on will be untracked and invisible to reviewers.
Before you start marking up, configure two settings:
- Display mode: Set to All Markup (not Simple Markup). All Markup shows every insertion, deletion, and comment in full. Simple Markup hides the detail and hides the risk.
- Your reviewer name: Go to File > Options > General (Windows) or Word > Preferences > User Information (Mac) and confirm your name and initials are correct. This is what appears next to every tracked change you make.
Step 2: Make Your Edits
With Track Changes on, edit normally. Deleted text appears as a strikethrough. New text appears underlined or in a contrasting color. Formatting changes are noted in the margin.
To add a comment, highlight the relevant text and click Review > New Comment (or press Ctrl + Alt + M on Windows / Cmd + Option + A on Mac). A well-placed comment turns a silent deletion into a negotiating position. It also dramatically reduces the back-and-forth that comes when the counterparty has no idea what drove a change.
Step 3: Review and Respond to Incoming Redlines
When you receive a redlined document, use the Review tab to work through each change:
- Next / Previous: step through edits one at a time
- Accept: confirm the change and incorporate it into the clean text
- Reject: remove the change and revert to the original language
- Accept All / Reject All: use with extreme caution; always review substantive contract edits individually
The Reviewing Pane (View > Reviewing Pane) lists every tracked change in the document chronologically. This is useful when the document has multiple reviewers or many rounds of edits layered on top of each other.
Step 4: Common Word Redlining Mistakes to Avoid
Even experienced practitioners make these errors regularly:
- Editing with Track Changes off: the most dangerous mistake. Any edit made without Track Changes active is invisible in the redline. Run a Compare Documents check before sending to catch untracked changes.
- Sending in Simple Markup view: the recipient sees a clean-looking document and may not realize they need to switch to All Markup to see the full redline.
- Accepting all changes before blacklining: if you run a blackline comparison after accepting all changes in a redline, the blackline will show nothing changed. Always blackline against the last agreed version, not an accepted copy.
- No version naming discipline: saving over the previous version or using generic names (“contract_final.docx”, “contract_final_v2.docx”) creates confusion fast. Use a consistent naming convention: NDA_CompanyA_v4_DT_2026-07-14.docx.
- Sending the redline when a blackline was expected: if a senior approver asked for a comparison of the final version against the executed template, sending a full redline with all in-progress commentary is the wrong document for the moment.
Why Confusing Redline and Blackline Has Real Consequences
An executive who receives a redline instead of a blackline sees dozens of changes in progress (commentary, questions, alternative language) and cannot tell what the final agreed position is. A legal team that sends a blackline instead of a redline to the counterparty removes all the explanatory comments that would have facilitated faster negotiation. A contract that goes to signature after someone accepted all changes without a final blackline check has no independent verification that the execution copy matched the agreed draft.
Poor contract risk management processes are estimated to cost organizations up to 9% of annual revenue. Version confusion is one of the most preventable contributors to that figure, and one of the easiest to fix with the right workflow.
How CLM Software Manages Redlines and Blacklines Automatically
At volume, managing redlines and blacklines manually in Word doesn’t scale. Version tracking, naming conventions, and display-mode errors multiply with every extra deal.
A modern Contract Lifecycle Management platform removes that manual layer: it tracks every revision as a live redline, generates clean version comparisons on demand, and keeps a full audit trail, without anyone having to remember to turn on Track Changes or run a Compare Documents check.
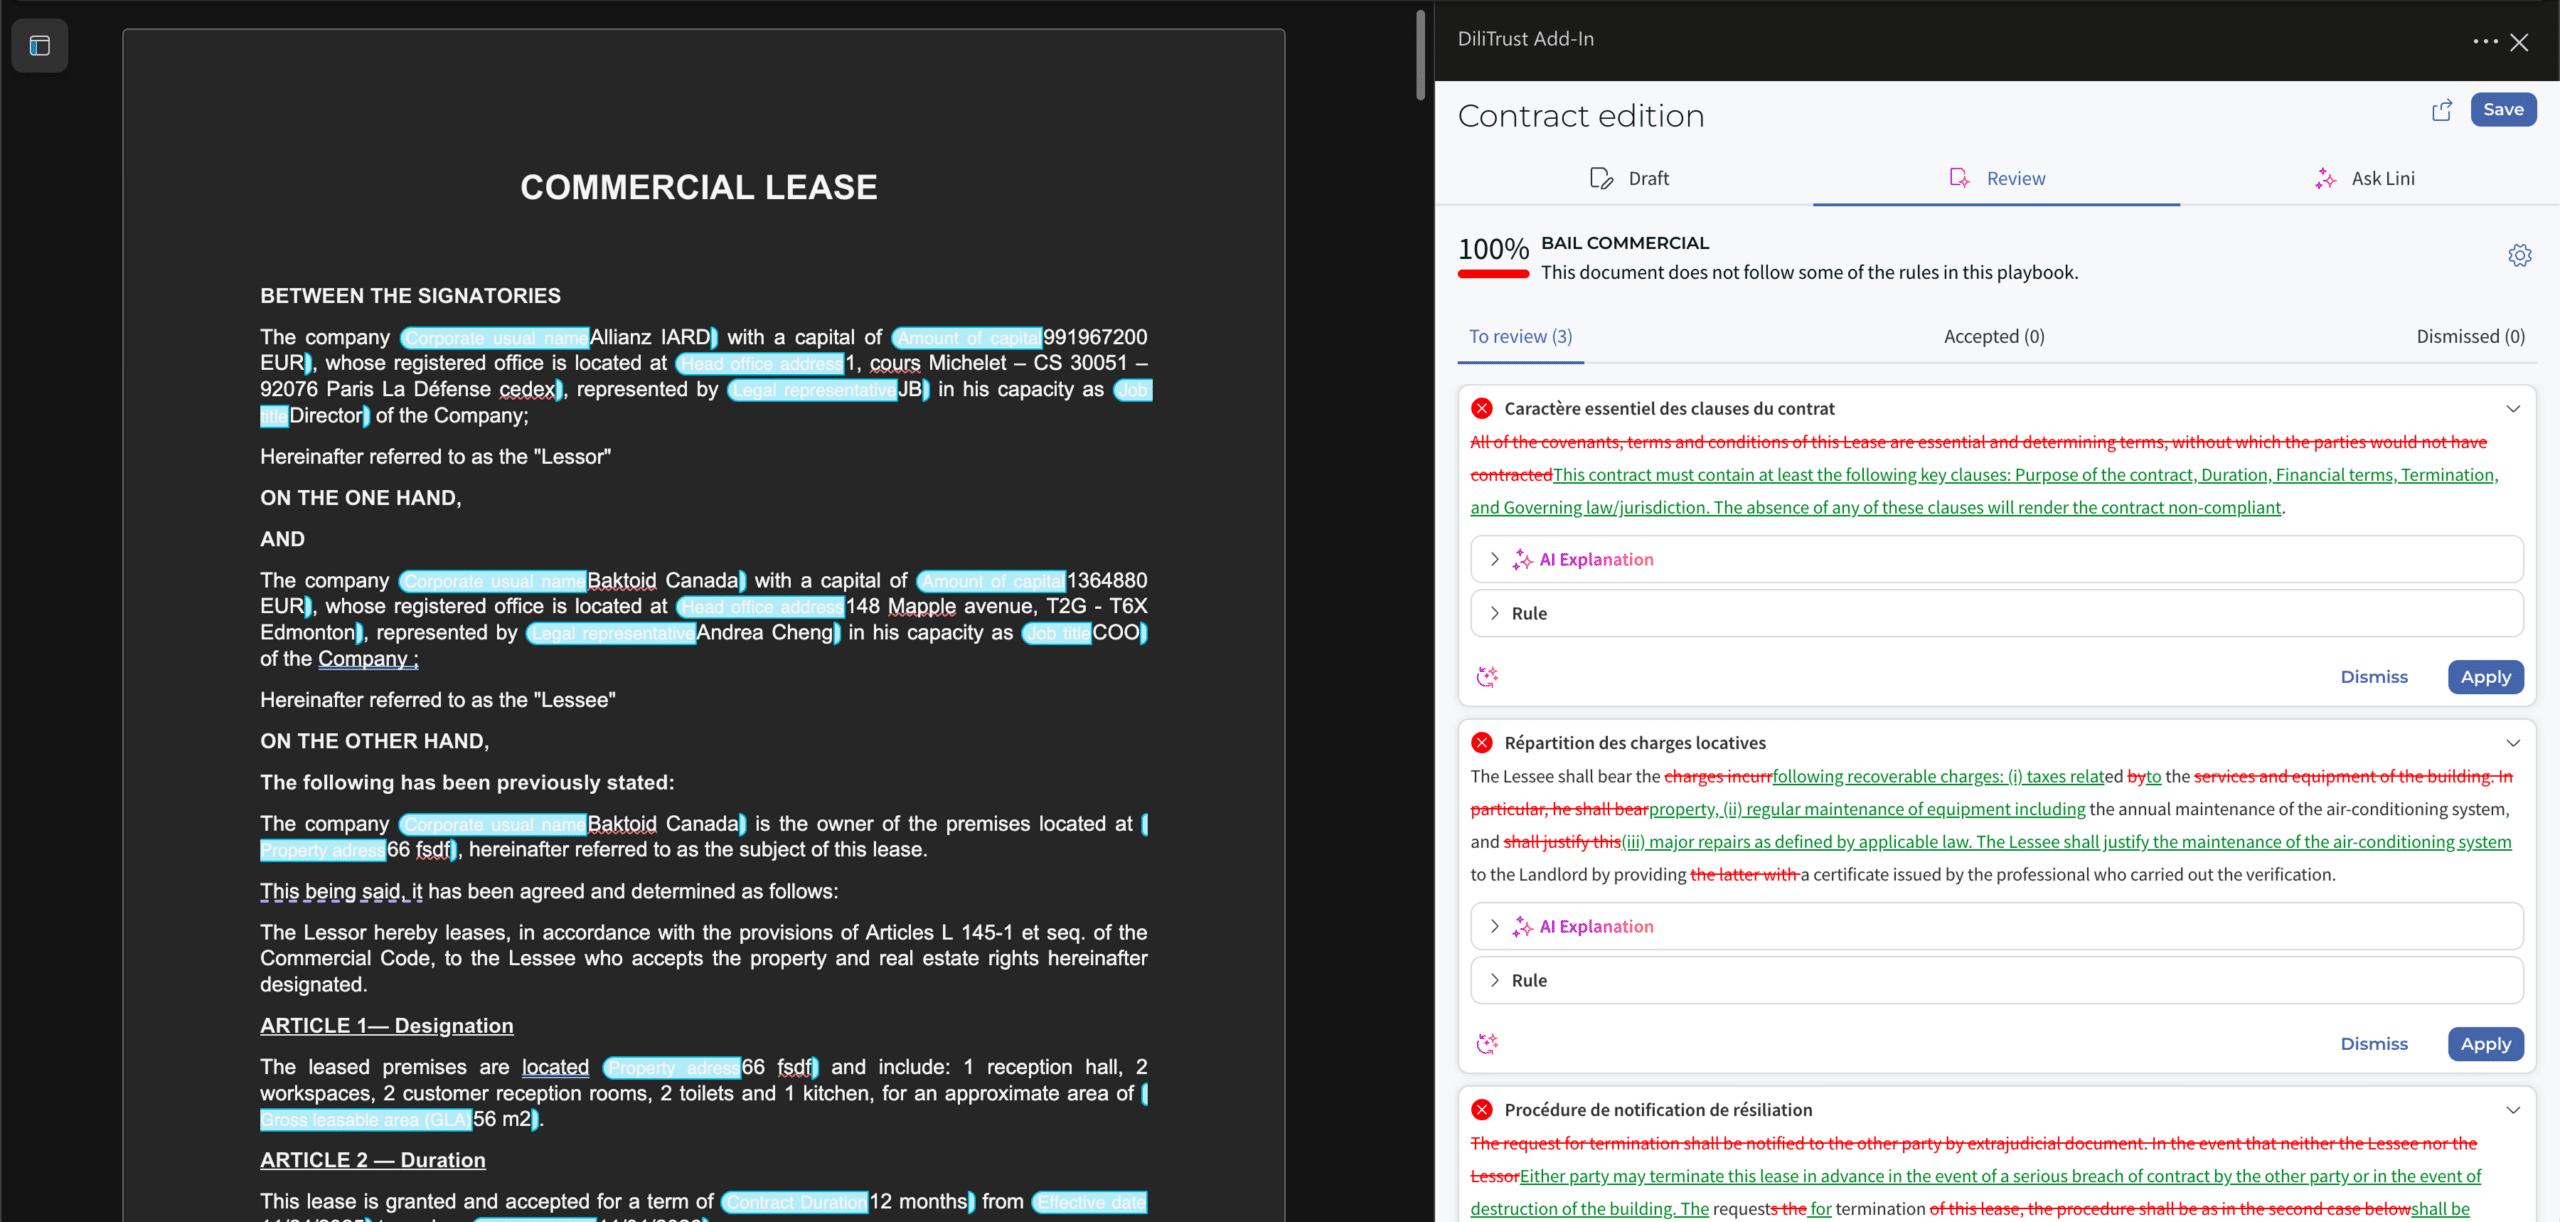
DiliTrust goes one step further. The DiliTrust Add-in for Microsoft Word lets your team draft, redline, and finalize contracts directly in Word while the platform manages versioning and the audit trail in the background. Its Risk Detector reviews each contract against your playbook and surfaces off-standard clauses as tracked changes, directly inside the same Word interface your team already uses. See how DiliTrust CLM works →
Frequently Asked Questions
What is the difference between a redline and a blackline?
A redline is a working draft with tracked changes and comments visible — used during active negotiation. A blackline is a clean comparison of two saved document versions — used to verify what changed between a baseline and the final copy. A redline is a negotiation tool; a blackline is a verification tool.
Can redline and blackline be used interchangeably?
In informal usage, some legal professionals use the terms interchangeably to mean “a document showing changes.” In practice, they refer to distinct documents with different purposes and different production methods. Using them in a professional context without distinction risks sending the wrong document at the wrong stage of a deal.
How do I redline a document in Microsoft Word?
Activate Track Changes under Review > Track Changes (shortcut: Ctrl + Shift + E on Windows, Cmd + Shift + E on Mac). Set the display to All Markup. Edit normally — deletions appear as strikethroughs, insertions appear underlined. Add explanatory comments using the New Comment button. Send the file with Track Changes still visible so the recipient can review, accept, or reject each change.
How do I create a blackline in Microsoft Word?
Go to Review > Compare > Compare. Select the original document and the revised document. Enable the Legal Blackline option under comparison settings. Word generates a new document showing only the content differences — without tracked changes or comments from the redline stage.
Can I redline contracts in Microsoft Word while using DiliTrust?
Yes. The DiliTrust Add-in for Microsoft Word lets you open a DiliTrust contract directly in Word (Online or Desktop), edit it with Track Changes on, and insert clauses from your clause library. Your tracked changes appear in DiliTrust in yellow, and clicking refresh in DiliTrust syncs your edits back into the platform, which handles version control and the audit trail automatically. It requires a Microsoft 365 E3/E5 or Business Standard/Premium license and one-time installation by an administrator through the Microsoft 365 Admin Center.
See redlining and blacklining handled automatically
Watch how DiliTrust CLM tracks every version, runs AI playbook review with Risk Detector, and keeps your team working right inside Microsoft Word.